How to Calibrate a Professional Paper Trimmer for Precision Cuts (2026 Guide)
Is your high-end equipment producing slanted edges that waste your premium materials? It's a common frustration when a tool designed for excellence begins to underperform, but the solution is often mechanical rather than a sign of a failing blade. Mastering the technical process of calibrating a professional paper trimmer allows you to restore the factory-standard precision your business relies on for a polished, professional presentation.
We understand the hesitation that comes with adjusting complex machinery. You shouldn't have to guess whether to attempt a DIY fix or pay for an expensive repair service while your projects sit unfinished. This guide provides the specialist knowledge required to align your trimmer so every cut is perfectly square and accurate to the millimetre. You'll learn how to perform daily calibration checks to detect deviations as small as 0.05 mm and how to maintain the surface flatness standards required for high-volume production. We will also detail the 500-hour maintenance cycle and the precise pneumatic adjustments needed for 2026 models. By following this methodical approach, you will keep your equipment running with the quiet confidence of a well-oiled production process.
Key Takeaways
- Learn how the relationship between the base, squaring arm, and blade rail creates the foundation for perfectly square cuts.
- Understand why inspecting blade sharpness and mat integrity is the essential first step in calibrating a professional paper trimmer.
- Identify the precision tools you'll need, such as digital calipers and machinist squares, to ensure accuracy to the millimetre.
- Master the adjustments for automatic clamp pressure to prevent paper drift and material waste during high-volume runs.
- Distinguish between routine alignment tasks and structural issues that require expert on-site repair to protect your equipment investment.
Understanding the Mechanics of Professional Trimmer Calibration
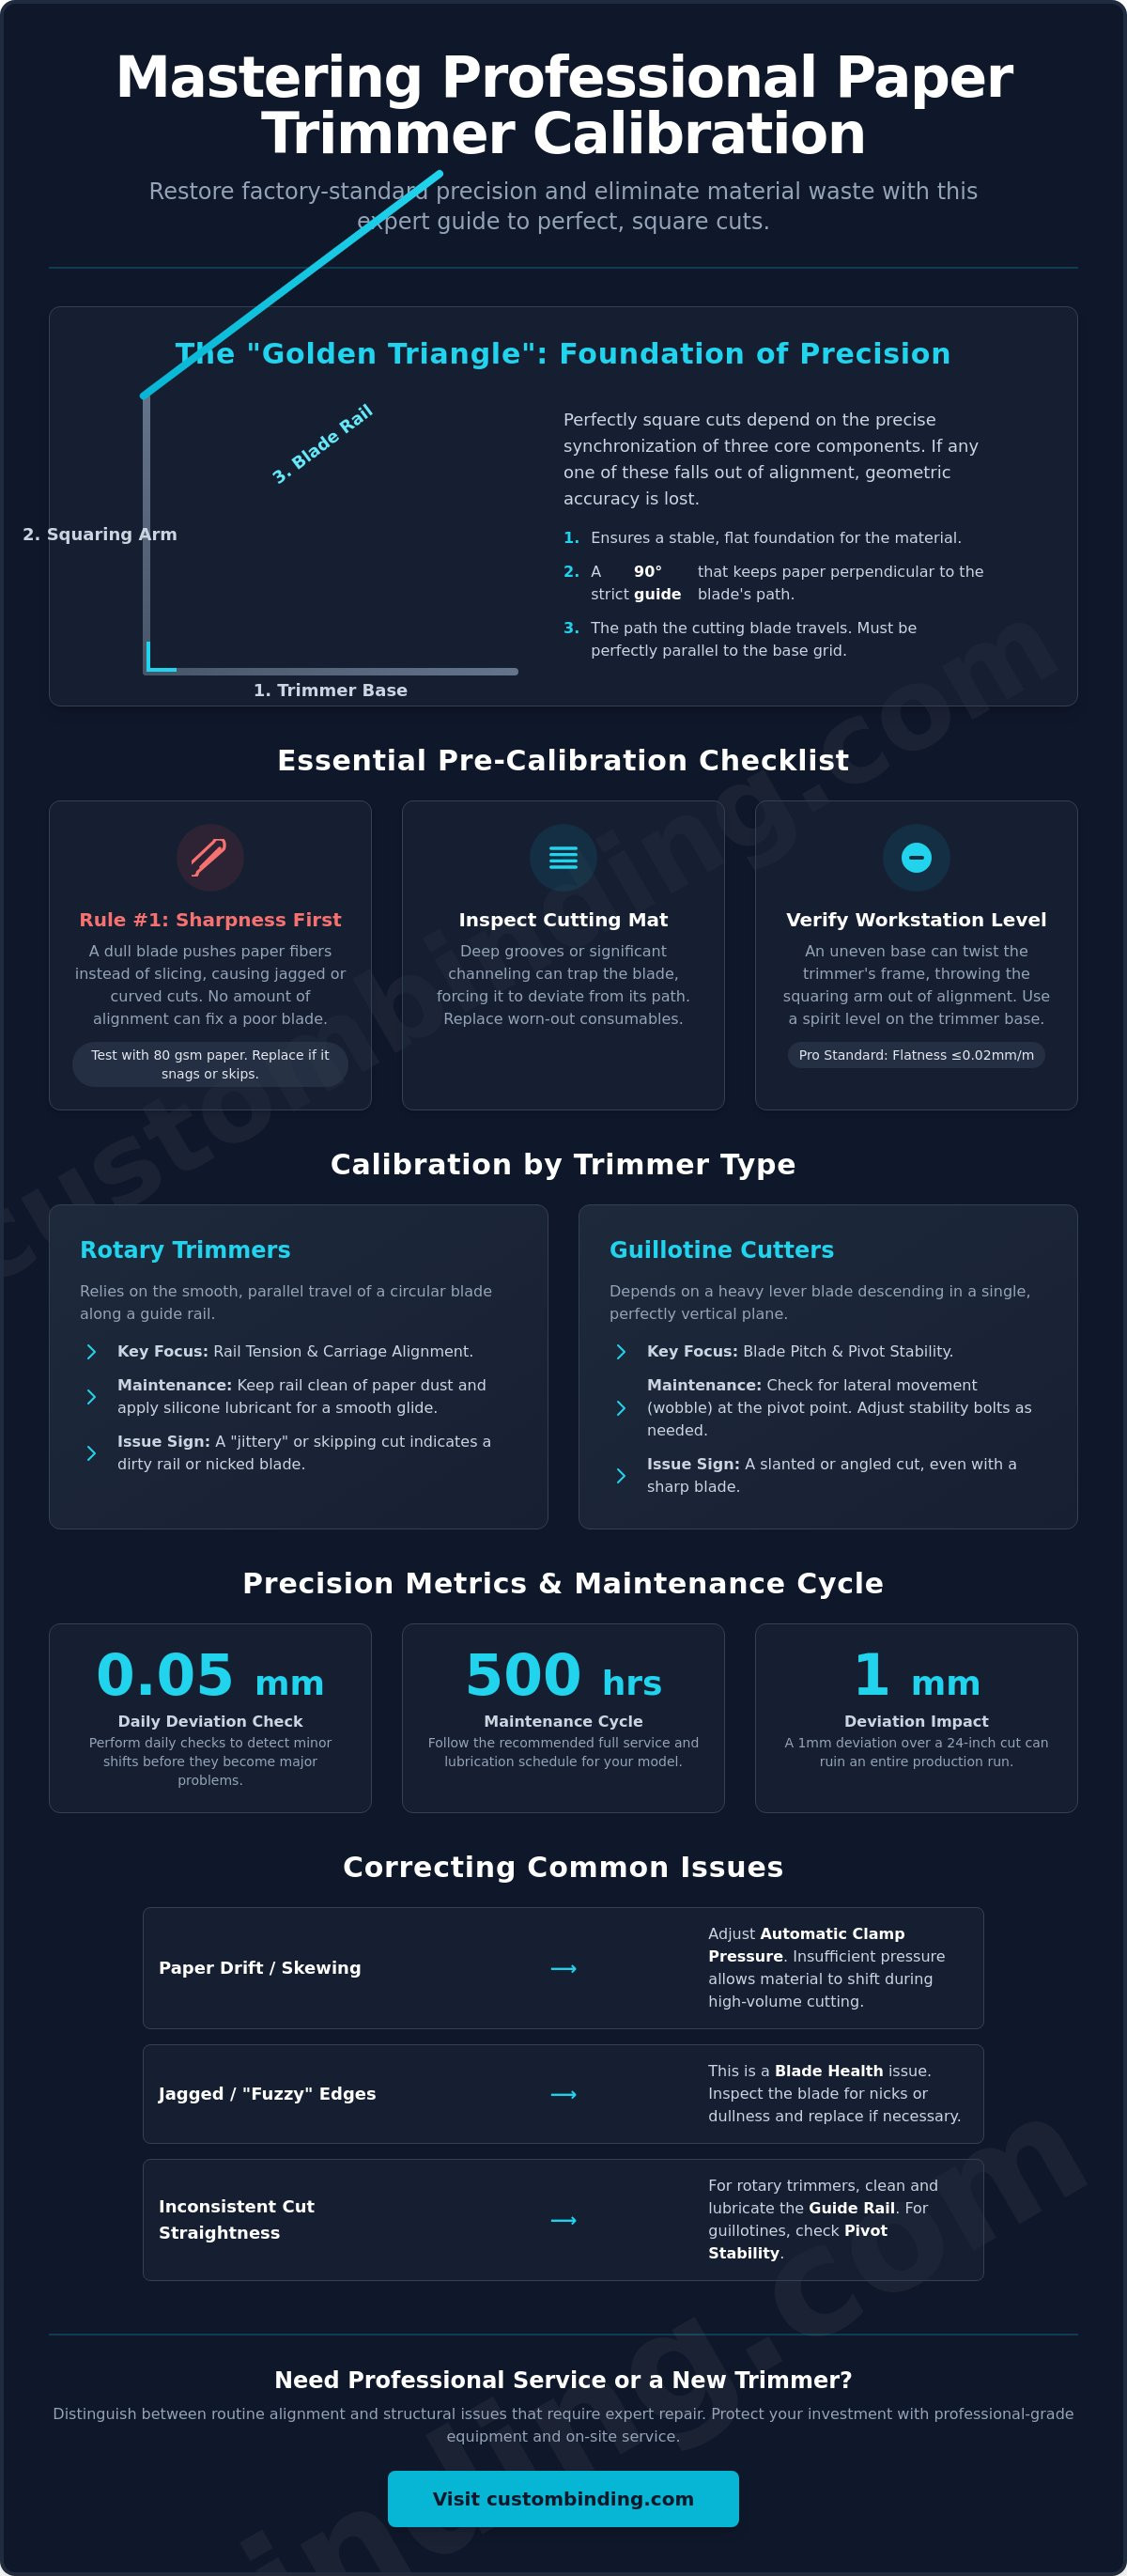
Calibration isn't just about maintaining a sharp blade; it's the precise synchronization of mechanical components to ensure geometric accuracy. When you're calibrating a professional paper trimmer, you're managing the critical relationship between the base, the squaring arm, and the blade rail. Industry specialists often refer to this as the "Golden Triangle" of trimming. If any one of these elements falls out of alignment, the resulting cut will lack the perfectly square edges required for a polished, professional presentation.
Even the most robust equipment experiences "factory drift" over time. High-volume environments subject machines to constant vibration and the resistance of dense materials, which gradually shifts internal settings. Whether you're using a heavy-duty paper cutter or a precision rotary tool, regular mechanical audits are necessary. This proactive approach prevents the frustration of wasted materials and ensures your equipment continues to operate with the quiet confidence of a seasoned specialist.
The Role of the Squaring Arm
The squaring arm serves as the primary horizontal guide, positioned at a strict 90-degree angle to the blade's path. Its function is to keep the paper perpendicular throughout the entire cutting stroke. You'll recognize a misalignment if your finished sheets appear skewed or don't sit flush in a binding spine. Even a 1mm deviation at the start of a 24-inch cut compounds significantly by the end of the stroke. This subtle error can ruin an entire production run, making it impossible to achieve a professional-grade finish.
Rotary vs. Guillotine Mechanics
Different trimmer types require different calibration strategies. Rotary models, including Dahle Professional Rolling Trimmers, rely on rail tension and carriage alignment. The circular blade must travel along a rail that stays perfectly parallel to the base grid. Guillotine cutters, however, depend on blade pitch and pivot stability. The heavy lever blade must descend in a single, vertical plane without any lateral movement. Many professional-grade machines feature user-adjustable bolts at these pivot points. By mastering these adjustments, you can handle calibrating a professional paper trimmer in-house, maintaining your workflow without unnecessary downtime.
Essential Pre-Calibration Inspections: Blades and Rails
Before you begin calibrating a professional paper trimmer, you must ensure the hardware is in peak physical condition. A dull blade is the most common cause of inaccurate cuts, often masquerading as a mechanical alignment issue. If the cutting edge is blunted, it pushes the paper fibers rather than slicing through them. This creates a jagged finish or a slight curve in the cut that no amount of mechanical adjustment can fix. Always adhere to the "Sharpness First" rule: verify the integrity of your cutting edge before touching the alignment bolts.
Examine the physical environment of the machine. Place a spirit level on the trimmer base to verify your workstation is perfectly flat. Precision standards for 2025 and 2026 suggest a surface flatness of ≤0.02mm/m for professional-grade accuracy. If the base is uneven, the frame can slightly twist, throwing off the squaring arm. Next, inspect the cutting mat or plastic strip. Deep grooves from repeated high-volume use can trap the blade, forcing it to deviate from its intended path. If you see significant channeling, replace these consumables to provide a smooth, predictable surface for the blade to meet.
Blade Health and Replacement
Identify nicks in a rotary blade by performing a test cut on a single sheet of 80 gsm paper. A repeating snag or skip indicates a damaged edge. While many professional models feature a self-sharpening mechanism, these systems cannot repair visible chips or severe blunting. If the blade fails to produce a clean edge on standard bond paper, it's time for a replacement. For those operating Dahle Professional Rolling Trimmers, maintaining a fresh blade is the simplest way to preserve the machine's factory-level precision and protect your professional reputation.
Rail Maintenance and Lubrication
Accumulated paper dust and adhesive residue on the guide rail lead to carriage "hiccups." These micro-stalls cause the blade to jitter, resulting in a cut that isn't perfectly straight. Wipe the rail with a dry, lint-free cloth to remove debris. Apply a light coating of silicone-based lubricant to ensure the carriage glides with minimal resistance. Finally, check for "play" or lateral movement in the carriage assembly. If the carriage wobbles when you apply pressure, tighten the mounting bolts to eliminate "blade walk." This ensures the blade follows a rigid, linear trajectory from the beginning of the stroke to the end.
The Step-by-Step Guide to Squaring Your Paper Trimmer
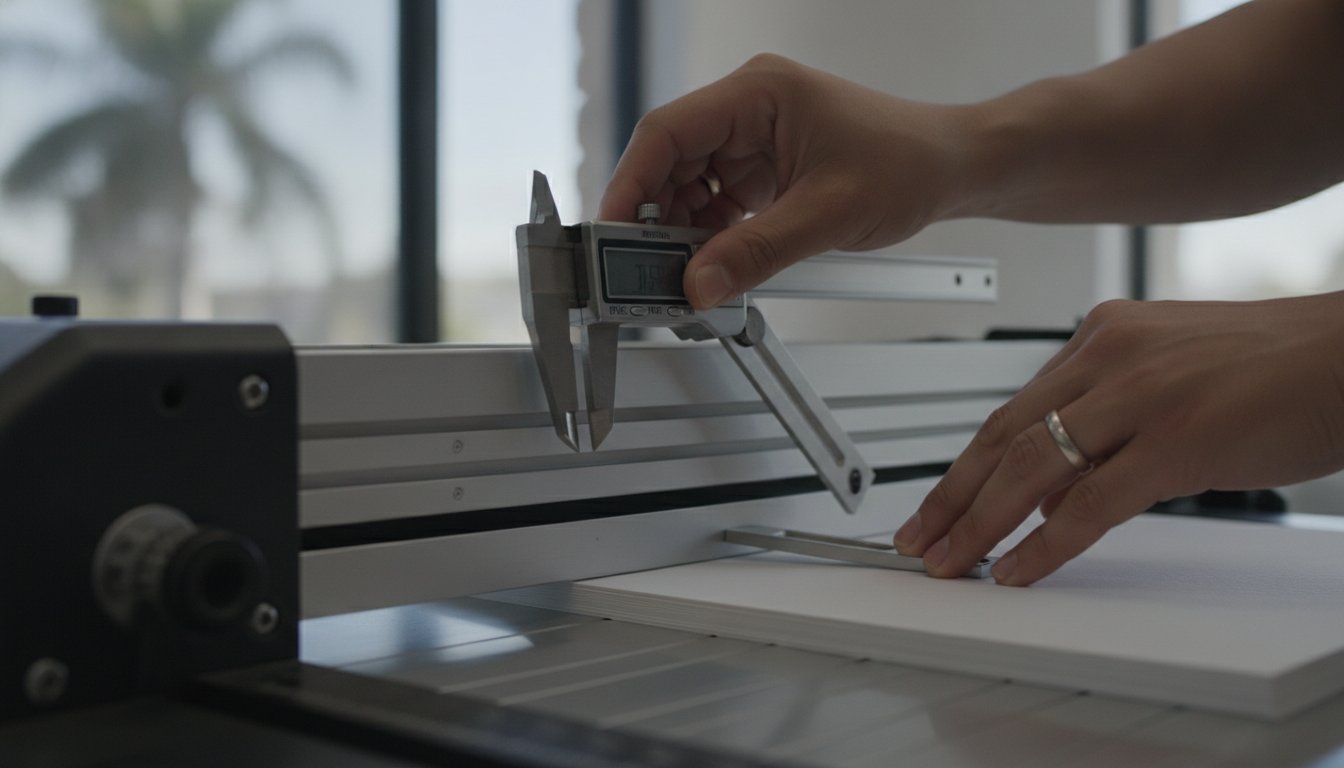
Once you've verified your blade health and workstation stability, you can proceed to the mechanical alignment. Calibrating a professional paper trimmer requires more than a standard ruler and a steady hand; it demands specialized tools to achieve sub-millimetre accuracy. Gather a machinist square, digital calipers, and several sheets of heavy cardstock. These tools allow you to detect the minute deviations that lead to slanted stacks and ruined professional presentations.
Begin by identifying the adjustment bolts that secure the squaring arm to the base. Most professional models use two or three hex bolts for this purpose. Loosen them just enough to allow for movement without making the arm feel loose or unstable. Place your machinist square firmly against the blade's cutting path and slide the squaring arm until it sits perfectly flush against the square's edge. This provides your initial 90-degree baseline. Tighten the bolts in a staggered pattern to prevent the arm from shifting as you apply torque.
Executing the 5-Cut Test
The 5-cut test is the industry standard for verifying squareness because it amplifies small errors, making them easier to measure. Take a square sheet of cardstock and perform the following sequence:
- Make a trim on the first side to create a clean edge.
- Rotate the sheet 90 degrees clockwise, placing the freshly cut edge against the squaring arm.
- Repeat this rotation and cutting process for the third and fourth sides.
- For the fifth cut, trim a thin sliver (about 10 mm wide) from the side you cut first.
Measure the width of this fifth sliver at both ends with your digital calipers. If the top measurement is 10.20 mm and the bottom is 10.00 mm, your total error is 0.20 mm. Divide this by four to find the error per cut. In this case, 0.05 mm is the threshold where a daily calibration check would flag a need for further adjustment.
Fine-Tuning the Squaring Arm
Incremental adjustments are the secret to a successful calibration. If your 5-cut test reveals an error, use a feeler gauge to nudge the squaring arm in the necessary direction. If the top of your fifth sliver was wider, the arm needs to move slightly "in" toward the blade. Move the arm in increments of 0.02 mm; over-adjusting is a common pitfall that leads to a cycle of constant correction. Once the measurements are equal at both ends of the sliver, lock the settings firmly. Perform one final verification cut to ensure your equipment is ready for high-volume production.
Correcting Common Alignment and Paper Drift Issues
Even after you've successfully squared the arm, your projects may still suffer from "paper creep." This occurs when the sheet shifts mid-cut, resulting in a slightly diagonal edge. This movement is often a symptom of "blade draw," where the physical force of the blade pulls a thick stack out of its original position. Calibrating a professional paper trimmer effectively means you must account for these dynamic forces, not just static measurements. You're looking for a result that remains accurate to the millimetre from the first sheet to the last.
To identify subtle drift, perform a daily calibration check. Cut ten strips of the same width and measure each with digital calipers. According to 2026 industry standards for high-speed cutters, a deviation of ±0.05 mm or more indicates that your clamp pressure or blade path requires adjustment. This methodical approach allows you to catch errors before they lead to wasted materials and professional frustration.
Managing Clamp Pressure
Insufficient pressure is the primary cause of diagonal drift. In professional guillotine models, you can often adjust the spring tension to provide a firmer hold on dense materials like 300 gsm cardstock. For rotary trimmers, the automatic clamp relies on a clean contact surface. Wipe down the rubber grip on the clamp regularly to remove paper dust and adhesive residue that cause slippage. If your current setup fails to hold steady during high-volume runs, it's worth upgrading to Dahle Professional Rolling Trimmers to ensure every cut remains perfectly secure.
Eliminating Rail Flex
Long-format trimmers face a unique challenge known as "bowing." This is most noticeable on cuts exceeding 24 inches, where the middle of the sheet appears slightly concave. Rail flex is the temporary deformation of the guide path under pressure. While it's easy to assume the rail is permanently bent, the issue is often a lack of central support on the workstation. Ensure the trimmer base is fully supported across its entire length on a rigid, level surface.
If you notice a consistent curve, check the carriage assembly for lateral play. A loose carriage allows the blade to "walk" away from the squaring arm as it travels. Tightening the carriage mounting bolts restores the rigid, linear trajectory needed for large-scale professional presentations. By addressing these physical variables, you prevent the frustration of expensive equipment underperforming and ensure your final aesthetic details remain sharp and professional.
Professional Maintenance and On-Site Repair in San Diego
While the technical steps outlined in the previous sections empower you to handle routine adjustments, there are instances where calibrating a professional paper trimmer requires specialized diagnostic equipment. Structural damage, such as a warped metal base or a compromised pivot assembly, often goes undetected by the untrained eye but results in consistent misalignment. For high-volume San Diego print shops and corporate mailrooms, professional maintenance isn't just a repair; it's an investment in your brand's reputation. Industry standards as of June 2026 recommend a complete mechanical calibration every 500 hours of operation or every three months, whichever comes first, to ensure your equipment continues to deliver a polished, professional presentation.
Identifying when to transition from DIY fixes to professional service is critical for protecting your hardware investment. If you've performed the 5-cut test and find that the error persists despite incremental adjustments, the issue likely lies in the internal tensioning systems or the frame's integrity. Attempting to force a calibration on a structurally compromised machine can lead to permanent damage. Our specialists act as a steady hand in these environments, removing the friction from preparation tasks and restoring the mechanical movement of components to their peak factory standards.
The Custom Binding Products Advantage
Since 1988, we've served the San Diego professional community as a Reliable Specialist for finishing and presentation equipment. We understand that your workflow depends on reliability and organized efficiency. Shipping heavy machinery like Dahle Professional Rolling Trimmers or Martin Yale Paper Folders is often risky and cost-prohibitive. We eliminate this burden by providing expert on-site support throughout the region. Our technicians bring decades of expertise directly to your facility, ensuring your professional rolling trimmers are calibrated with the precision required for high-stakes storytelling and branding.
Scheduling Your Professional Service
Minimizing downtime is our priority. When you request a quote for our equipment repair and maintenance services, you're partnering with a team that values order and aesthetics in equal measure. During a professional service visit, we do more than just sharpen blades. We perform deep-cleaning of the carriage rails, optimize pneumatic systems to the required 6±0.2 bar for precision models, and maintain detailed maintenance logs to track your machine's performance over time. This methodical approach ensures that when you press the blade down, the result is a tactile marker of quality that instills immediate confidence in your clients.
Achieving Lasting Accuracy in Your Finishing Process
Maintaining the geometric integrity of your equipment is the only way to guarantee a perfectly square finish on every project. By implementing systematic checks and adhering to a strict mechanical audit schedule, you ensure your tools reflect the high quality of the work they contain. Calibrating a professional paper trimmer isn't just a mechanical chore; it's a vital investment in the professional image your brand projects through every tactile detail. Precision at the millimetre level prevents material waste and instills immediate confidence in your clients.
When DIY adjustments aren't enough to solve complex structural issues, our specialists are ready to provide a steady hand. We've served as San Diego's reliable equipment partners since 1988, acting as authorized dealers for industry leaders like Dahle and Martin Yale. We provide comprehensive on-site repair and maintenance services to remove the friction from your production workflow and keep your shop running at peak efficiency.
Request Professional On-Site Trimmer Calibration in San Diego today to restore your equipment to its original factory standards. With a proactive approach to maintenance, your trimmer will remain a dependable asset that supports your professional success for years to come.
Frequently Asked Questions
How often should I calibrate my professional paper trimmer?
Perform a complete calibration every 500 hours of operation or every three months, whichever comes first. High-volume environments subject machines to constant vibration, which gradually shifts factory settings. Implementing a daily check for the back gauge by measuring test strips with a digital caliper ensures you catch deviations before they impact your professional presentation. This proactive schedule maintains the organized efficiency your business requires.
Why is my trimmer cutting straight at the beginning but drifting at the end?
End-of-cut drift is usually caused by "blade draw" or insufficient clamp pressure. As the blade travels through the paper, the physical resistance pulls the stack away from the squaring arm. Clean the rubber grip on your clamp to remove paper dust and ensure it provides a firm hold. Mastering the process of calibrating a professional paper trimmer involves adjusting these pressure settings to match your material density.
Can I sharpen my own rotary trimmer blade?
You should not attempt to manually sharpen a professional rotary blade. High-end models, such as Dahle Professional Rolling Trimmers, utilize a self-sharpening mechanism where the circular blade hones itself against the counter-blade during use. Once a blade is chipped or fails to produce a clean edge on standard bond paper, replacement is the only way to restore the precision required for a polished result.
What tools do I need to calibrate a Dahle professional trimmer?
Calibrating a Dahle professional trimmer requires a machinist square, digital calipers, and a set of hex keys. These precision tools allow you to loosen the adjustment bolts on the squaring arm and reset the 90-degree baseline with absolute accuracy. Using specialized instruments rather than standard rulers ensures your equipment remains accurate to the millimetre, reflecting the pride in craftsmanship inherent in your professional work.
Is it worth repairing an old professional paper trimmer?
Repairing a professional-grade machine from brands like Dahle or Martin Yale is a sound investment in your professional image. These units feature durable components designed for long-term reliability and can often be restored to factory standards with a simple alignment or blade replacement. Choosing specialist on-site repair in San Diego is faster and more cost-effective than replacing heavy machinery that still possesses structural integrity.
Does paper weight affect the calibration of my trimmer?
Paper weight significantly impacts the mechanical requirements of your cut. Heavier stocks require increased clamp pressure to prevent "paper creep" while very thin materials can buckle if the blade is slightly dull. When you're calibrating a professional paper trimmer, you must account for the basis weight and moisture content of your media. Adjusting your machine for different densities ensures every tactile experience of your product remains consistent.
How do I know if my squaring arm is out of alignment?
Identify misalignment by checking if your finished sheets sit flush in a binding spine or folder. A visible gap between the paper edge and the guide rail when the sheet is seated indicates the 90-degree angle has drifted. If your test cuts reveal a deviation of ±0.05 mm or more, it's a clear signal to perform a mechanical audit. This methodical detection prevents the frustration of wasted premium materials.
What is the 5-cut test for paper trimmers?
The 5-cut test is the industry standard method for amplifying and measuring minute alignment errors. By rotating a single sheet of cardstock 90 degrees for five consecutive cuts, you multiply any existing deviation by four. This process makes it easier to calculate the exact error rate using digital calipers. It provides a steady, logical rhythm for fine-tuning your squaring arm to achieve a superior professional outcome.
Recent Posts
-
Upgrading Your Office Binding System: The 2026 Professional Guide
Did you know that switching from a manual punch to an electric binding machine can save your team …Jun 27th 2026 -
Professional Wire Binding Supplies in San Diego: Your 2026 Essential Guide
Imagine handing a potential client a thick, high-value report, only for the pages to snag because …Jun 26th 2026 -
Best Binding Method for Professional Reports: A 2026 Executive Guide
The physical feel of your document often speaks louder than the data on the page. In a high-stakes …Jun 25th 2026