How to Clean Roll Laminator Rollers: The Professional’s Maintenance Guide
Scrubbing your silicone rollers with aggressive force is often the fastest way to ruin them, as the real secret to professional maintenance lies in thermal management rather than physical elbow grease. You've likely felt that spike of frustration when a critical project is halted by adhesive transfer or a messy wrap-around. It's a common struggle to figure out how to clean roll laminator rollers without causing permanent surface scratches or facing costly machine downtime during a busy production run.
We understand that your equipment is an investment in your professional image, and maintaining it shouldn't be a source of anxiety. This guide will help you master safe, effective techniques for removing stubborn buildup and restoring your machine's performance using approved cleaning agents and precise temperature settings. We'll walk through a repeatable routine that ensures crystal-clear results while keeping you compliant with essential safety standards like OSHA's Hazard Communication Standard. By following this specialist approach, you'll transform a tedious chore into a streamlined process that protects your rollers and elevates the quality of every finished piece.
Key Takeaways
- Protect your equipment investment by strictly avoiding metal blades and harsh abrasives that can permanently scratch sensitive silicone surfaces.
- Master the professional technique of how to clean roll laminator rollers by utilizing a specific warm-up phase to soften adhesive for easier removal.
- Resolve severe jams and "death spirals" safely by identifying the exact moments when the reverse function helps or hinders the recovery process.
- Eliminate the root causes of silvering and bubbles by removing the inevitable adhesive squeeze-out that disrupts uniform pressure during the lamination cycle.
- Establish a repeatable maintenance calendar and end-of-day cleaning habits to ensure your machine remains ready for high-stakes professional presentations.
Why Dirty Rollers Ruin Your Professional Finish
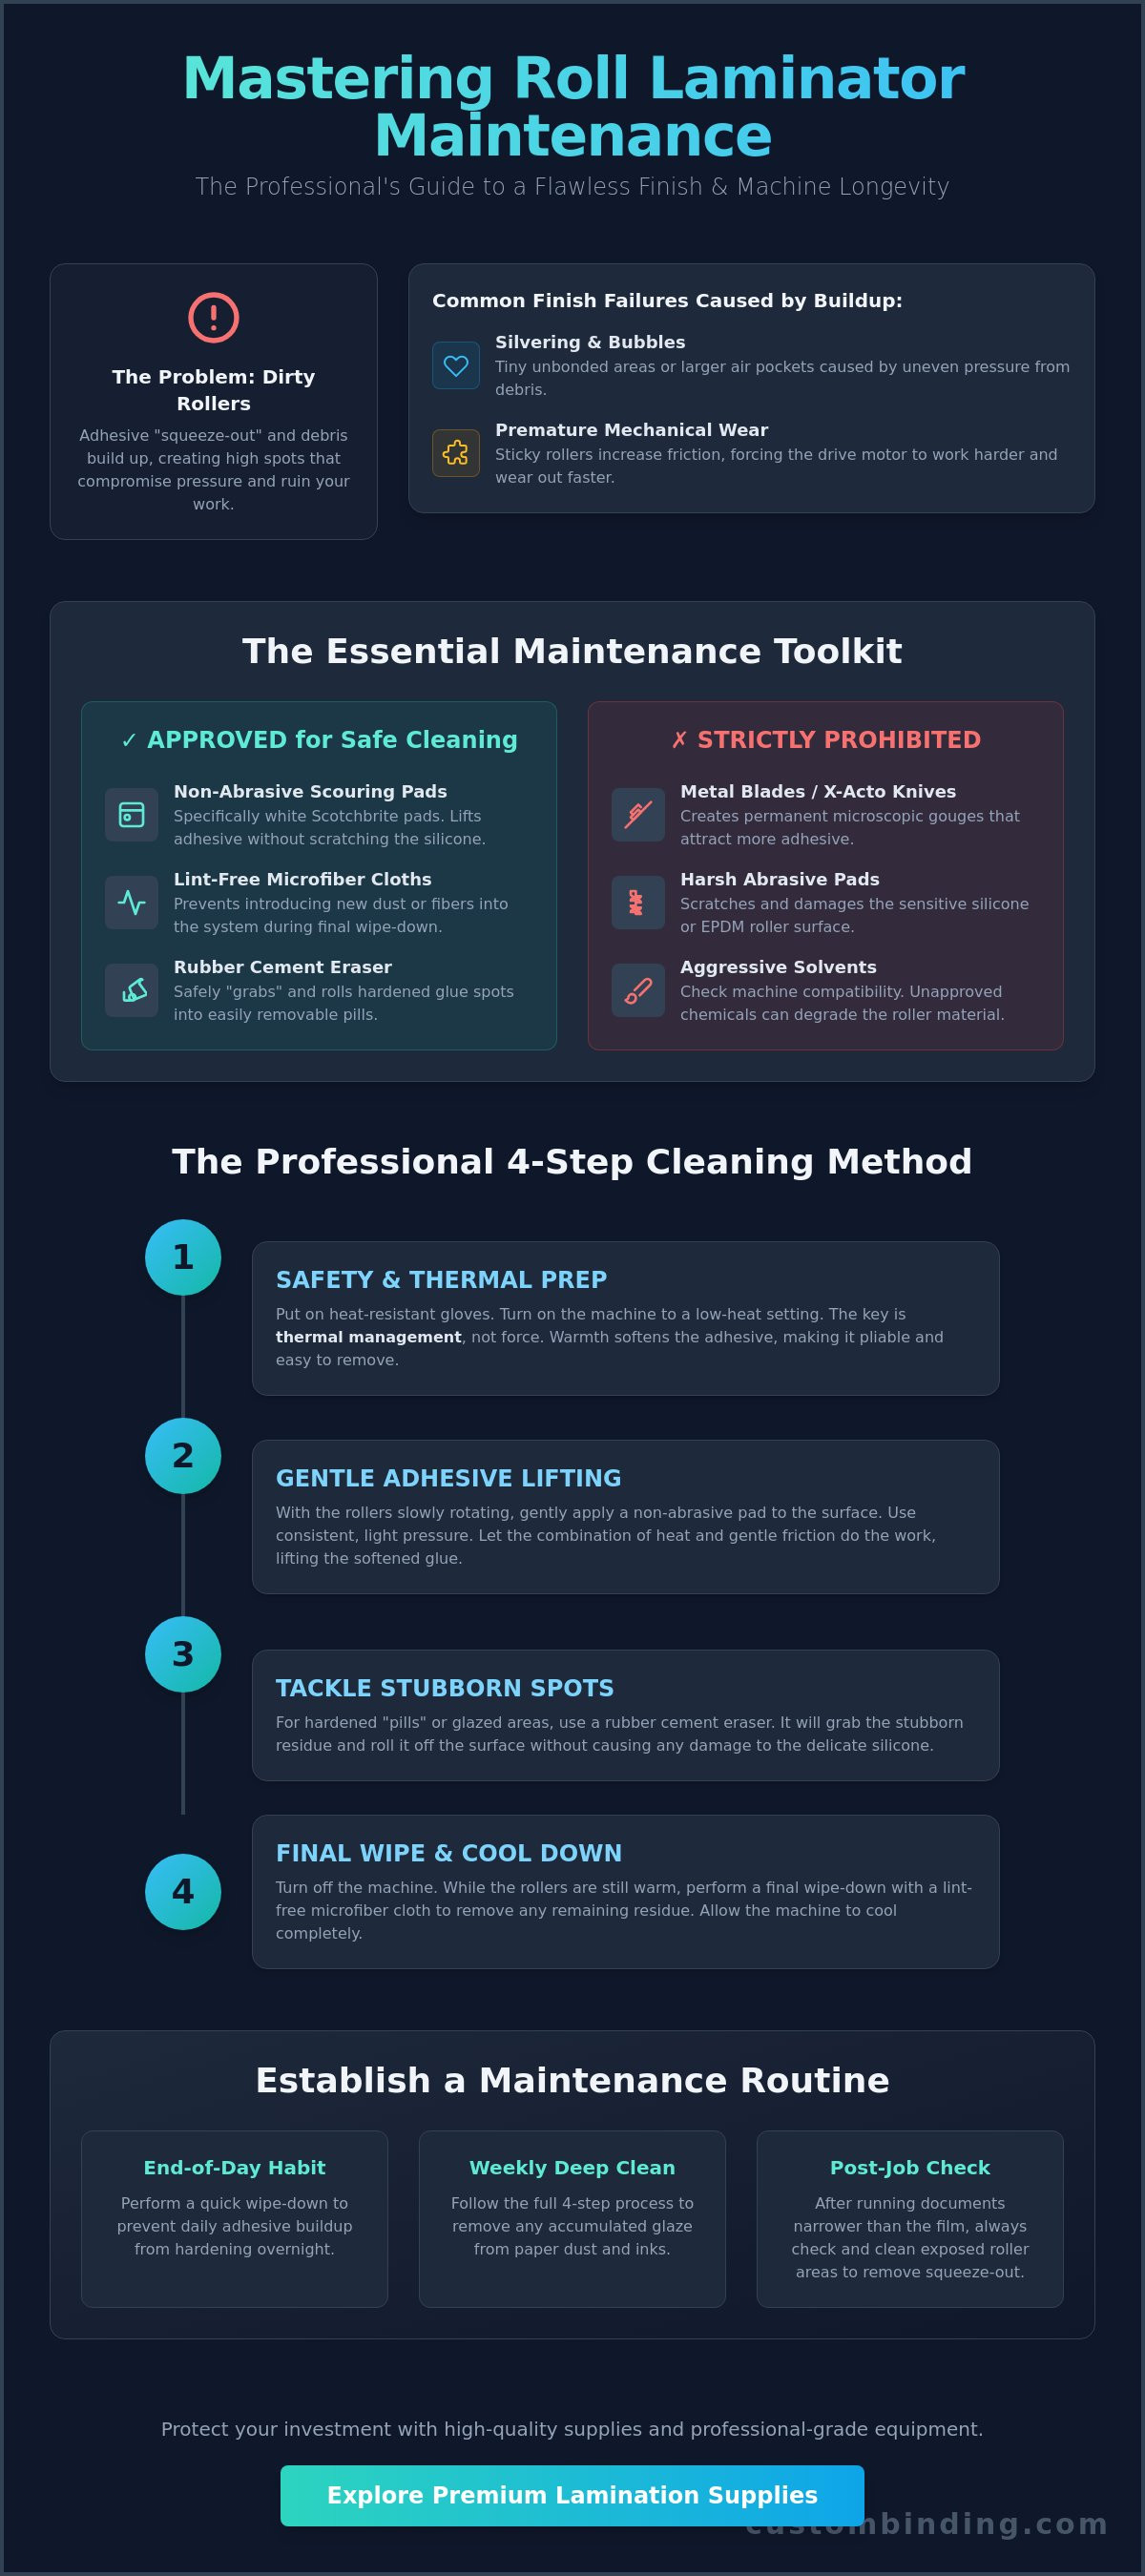
A flawless lamination job relies on three variables: heat, speed, and uniform pressure. When adhesive buildup accumulates on your rollers, you lose that critical third component. This phenomenon, often called "adhesive squeeze-out," occurs because the thermal adhesive on the film liquefies under heat and pressure. To understand what is lamination at its core, one must recognize that this adhesive is designed to bond, and it doesn't distinguish between your document and the roller surface. Squeeze-out is an inevitable byproduct of the process, especially when running documents narrower than the film roll.
This buildup creates "high spots" on the roller surface. Even a microscopic layer of hardened glue prevents the rollers from making perfect contact with the film. You'll see this manifest as "silvering," which are tiny unbonded areas that look like silver streaks, or larger, localized bubbles. Beyond the aesthetic failure, sticky rollers increase friction. This forces the drive motor to work harder to pull the film through, which eventually leads to premature mechanical wear. Learning how to clean roll laminator rollers is a preventative measure for your machine's motor just as much as it is a quality control step for your projects.
The Anatomy of a Roll Laminator Roller
Most professional machines use either silicone or EPDM rubber rollers. Silicone is prized for its heat resistance and release properties, but it's incredibly sensitive to physical damage. The "nip," or the exact point where the two rollers meet, is the most vital area. If the nip is compromised by debris, the entire lamination cycle fails. Heat plays a dual role here; it activates the adhesive during production but also serves as the key to softening that same adhesive during the cleaning process.
Common Debris: More Than Just Glue
Your rollers don't just collect adhesive. They act as magnets for paper dust and oils from digital inks. Over time, these elements mix with the adhesive to create a hard, glassy "glaze" that is significantly more difficult to remove than fresh glue. If left unchecked, this glaze can lead to a "wrap-around," where the film loses its path and fuses directly to the roller core. The frequency of your cleaning should increase when using thicker 10 mil films, as these contain more adhesive volume than standard 3 mil options. Recognizing the warning signs, like a rhythmic ticking sound or visible film "chatter," allows you to intervene before a total jam occurs.
Essential Tools and Safety Precautions for Roller Maintenance
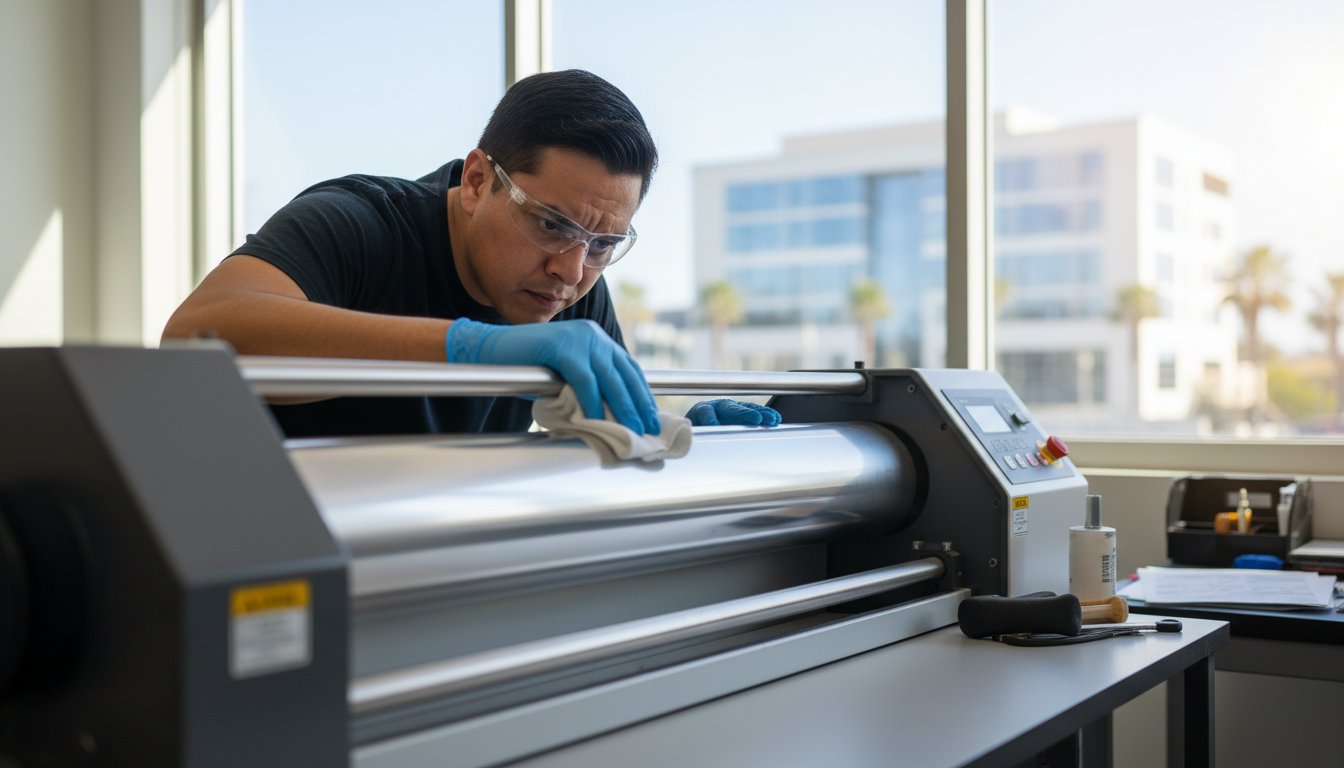
Using the wrong tool for maintenance is often more destructive than the adhesive buildup itself. You must strictly ban metal blades, X-Acto knives, and harsh abrasive pads from your workspace. While it's tempting to scrape off a stubborn "pill" of glue with a razor, doing so creates microscopic gouges in the silicone or EPDM surface. These pits become magnets for future adhesive, leading to a cycle of rapid accumulation and poor finish quality. Instead, professional maintenance relies on chemical softening and gentle friction to preserve the roller's integrity.
Personal safety is just as critical as machine health. You'll often need to work with the machine at a low-heat setting to make the adhesive pliable. Wear heat-resistant gloves if you're working close to the heating elements. If you're using specialized chemicals, ensure your workspace has adequate ventilation to prevent the inhalation of concentrated vapors. For a deeper look at the technical requirements for different machine types, consult this detailed guide to cleaning laminator rollers.
Your Professional Cleaning Kit
Standardize your kit with non-abrasive scouring pads, specifically white Scotchbrite pads. These provide enough friction to lift adhesive without scratching the roller's delicate surface. Pair these with lint-free microfiber cloths to ensure you aren't introducing new debris into the system. For localized spots of hardened glue, a rubber cement eraser is an indispensable tool. It "grabs" the adhesive and rolls it into manageable pills that you can easily wipe away. Using high-quality roll laminating film from the start can also minimize the amount of squeeze-out you have to deal with later.
Chemical Compatibility Check
Understanding how to clean roll laminator rollers requires knowing which chemicals your rollers can tolerate. Silicone rollers are highly susceptible to petroleum-based solvents, which can cause the material to swell, soften, or even detach from the core. Denatured alcohol is the industry standard for most rubber and silicone surfaces, but it should be used sparingly. Perform an "alcohol test" by applying a small amount to a non-critical edge of the roller; if the rubber appears to dry out or change color immediately, switch to a milder specialized roller cleaner or a simple solution of mild dish soap and water. This water-based approach is also the safest choice for school environments or offices where harsh chemicals are restricted.
Step-by-Step Guide: How to Clean Roll Laminator Rollers
Mastering how to clean roll laminator rollers requires a methodical approach that balances heat and patience. Before you begin, clear your workspace and remove the film from the machine. Cut the film between the supply rolls and the rollers, then carefully pull the remaining material through while the machine is still warm. This prevents the film from cooling and bonding to the rollers during your maintenance session. Having a clear view of the roller surfaces is essential for identifying the specific "trouble spots" where adhesive has pooled.
Professional maintenance follows a "top-down" logic. You should always clean the upper roller first. This prevents loosened debris or cleaning fluid from dripping onto a lower roller you've already serviced. To reach all surfaces, use the machine's "inch" or "jog" function to advance the rollers in small increments. Never attempt to clean the rollers while they're in continuous high-speed motion, as this creates a significant safety risk for your hands and your cleaning tools.
Phase 1: Softening the Adhesive
Set your machine, such as a Tamerica Optimus-450, to a standby or low-heat setting, typically between 150°F and 200°F. This temperature range is high enough to make the adhesive tacky but low enough to handle safely with a cleaning pad. Once the rollers reach this "sweet spot," run a heavy cardstock leader sheet through the nip several times. This simple step often lifts away the softest layers of glue, reducing the amount of manual scrubbing required in the next phase. Watch the rollers as they turn to locate the heaviest areas of "glaze" or buildup.
Phase 2: The Manual Clean
Stop the rollers completely before applying your cleaner. Apply your denatured alcohol or specialized roller cleaner to your white scouring pad first; don't pour chemicals directly onto the machine components. Use firm, circular motions to lift the glue. Professional specialists work from the center of the roller outward to the edges. This technique ensures you aren't just pushing liquified adhesive into the center of the roller where it will cause bubbles on your next project. If you encounter a stubborn "pill" of glue, apply steady pressure with your rubber cement eraser rather than increasing your scrubbing speed.
Phase 3: Rinse and Reset
After the adhesive is removed, wipe the rollers down with a clean, damp microfiber cloth. This removes any chemical residue that might interfere with the bond of your next roll of film. It's vital to wait for the rollers to dry completely and return to their operating temperature before re-threading. Once you've re-loaded your film, perform a "dry run" using a piece of scrap paper or a non-critical document. This final inspection confirms that the rollers are smooth and that your cleaning process hasn't left any streaks or lint behind.
Troubleshooting Severe Jams and "Death Spirals"
A "death spiral" occurs when the film loses its path and wraps entirely around the roller, fusing multiple layers into a solid, melted mass. This is the ultimate test of patience for any operator. Your first instinct might be to hit the reverse button. While the reverse function is useful for minor feeding errors, using it on a severe wrap-around can actually bunch the film tighter against the roller core, which increases the risk of mechanical strain on the drive gears. Instead, stop the machine immediately and assess the bond.
To begin the recovery, you must understand how to clean roll laminator rollers that have been compromised by a full jam. If the film is still warm, you may be able to find the "tail" and peel it back slowly. If the film has cooled and hardened, you will need to re-apply low heat to soften the adhesive bond. Never use a metal blade to cut the film off. A single nick, even one as small as 1/100th of an inch, creates a permanent repeating bubble on every document you laminate thereafter. If your current equipment is prone to these failures, consider investing in a high-performance Tamerica Optimus-450 to ensure more reliable film tracking.
The "Scraping" Myth
Many operators believe they can carefully scrape away film with a razor or utility knife. This is a myth that often leads to expensive roller replacements. If you must apply physical pressure to lift a layer of film, use a plastic spatula or a wooden popsicle stick. These materials are softer than the silicone or EPDM rubber, which ensures you won't gouge the surface. The goal is to use heat to make the adhesive pliable enough that it releases with minimal force. Learning how to clean roll laminator rollers without metal tools is the hallmark of a true professional.
When the Adhesive is "Baked On"
On older machines or those that haven't been maintained, adhesive can become "baked on," forming a hard, glassy glaze that resists standard cleaning. For these extreme cases, you can use the "soak" method on a cold machine. Drape a lint-free cloth dampened with specialized roller cleaner over the affected area and let it sit for 15 to 20 minutes. This gives the chemical time to penetrate the hardened layers. If the roller surface remains dull or textured after a deep clean, it has likely become "glazed" or developed a "flat spot" from being left under pressure while hot. At this stage, the roller usually requires professional resurfacing to restore a professional finish.
Preventative Maintenance and Professional Support in San Diego
Establishing a consistent preventative routine is the most effective way to extend the life of your equipment and maintain a high-standard professional finish. While mastering how to clean roll laminator rollers is essential for recovery, your primary goal should be minimizing the need for deep cleaning. The most reliable "end-of-day" habit you can adopt is running a dedicated cleaning sheet through the machine after your final session. These sheets are designed to pull off fresh, soft adhesive before it has the chance to cool and harden into the glassy glaze discussed in previous sections. This simple 30-second task can reduce your manual scrubbing time by half over the course of a month.
Your maintenance calendar should mirror your production volume. A high-output copy center requires a different approach than a low-volume office setting. If you're processing hundreds of feet of film daily, a weekly deep-clean inspection is mandatory. Utilizing high-quality roll laminating film also plays a significant role in prevention. Premium films are engineered with more stable adhesive layers that resist excessive squeeze-out at the edges, keeping your rollers cleaner for longer periods. By investing in superior supplies, you protect the mechanical integrity of your machine and your professional reputation.
The Daily Maintenance Checklist
Incorporate these three steps into your daily closing procedure to ensure your machine remains in peak condition. First, inspect the edges of the rollers for any visible "squeeze-out" while the machine is still warm. Second, wipe down the feed trays with a dry microfiber cloth; this prevents paper dust from entering the nip and creating an abrasive paste with the adhesive. Finally, check that the cooling fans are clear of debris. Obstructed fans lead to overheating, which makes the adhesive more fluid and prone to wrapping around the roller core.
Professional On-Site Repair in San Diego
There are moments when DIY maintenance is no longer sufficient. If your rollers show signs of "flat spotting," deep pitting, or if they've become so glazed that documents consistently exit with bubbles, it's time for professional intervention. For organizations in the San Diego area, Custom Binding Products provides specialized on-site repair and precision roller alignment. A professional tune-up ensures that your rollers exert perfectly even pressure across the entire width of the machine, a task that's difficult to achieve through cleaning alone. Our specialists understand the nuances of how to clean roll laminator rollers in high-volume environments and can identify early signs of motor strain before they lead to a total system failure. Partnering with a local specialist ensures your projects never face unnecessary downtime.
Protect Your Equipment Investment for the Long Term
Maintaining a high-quality finish is as much about the tools you use as the care you provide. By now, you understand that thermal management and the use of non-abrasive materials are the core pillars of professional maintenance. You've learned how to clean roll laminator rollers by softening adhesive with controlled heat and avoiding the destructive scraping of metal blades. These habits don't just produce cleaner documents; they protect the drive motor and extend the lifespan of your machine's critical components. Consistent daily habits, like running cleaning sheets, ensure that your equipment remains a reliable partner in your professional success.
When DIY methods aren't enough to restore your machine's precision, expert assistance is just a call away. Custom Binding Products has been serving San Diego since 1988, offering specialized on-site technical support and repair. As an authorized dealer for leading brands like Akiles, Tamerica, and Rhin-O-Tuff, we have the technical expertise to handle complex roller alignment and mechanical restoration. Schedule Professional Laminator Repair in San Diego today to ensure your equipment continues to reflect the excellence of your work. Your commitment to proper maintenance ensures that every presentation remains a tactile testament to your professionalism.
Frequently Asked Questions
Can I use Goo Gone to clean my laminator rollers?
You should avoid using Goo Gone or any petroleum based citrus cleaners on silicone rollers. These substances can cause the rubber to swell or degrade over time, which compromises the roller's ability to apply even pressure. Stick to denatured alcohol or manufacturer approved cleaning agents to ensure you don't void your warranty or damage the machine's internal components.
How often should I clean my roll laminator?
Clean your machine based on your production volume. If you run the laminator daily, use a cleaning sheet at the end of every shift. For moderate use, a deep inspection of how to clean roll laminator rollers should occur every 20 to 40 hours of operation. Regular maintenance prevents adhesive from glazing, which makes future cleaning sessions much faster and less physically demanding.
What happens if I accidentally scratch my silicone roller?
A scratch on a silicone roller is unfortunately permanent. Because the roller surface must be perfectly smooth to apply uniform pressure, even a small nick will leave a repeating bubble or streak on every document. If the scratch is deep, you'll need to contact a specialist for a roller replacement to restore the professional quality of your lamination.
Why is my laminator smoking during the cleaning process?
Smoking during cleaning usually indicates that liquified adhesive or cleaning chemical residue is coming into direct contact with high heat elements. If this occurs, immediately turn the heat down to a standby setting and ensure your workspace has proper ventilation. Always apply cleaners to your pad rather than spraying them directly into the machine to prevent this safety hazard.
Are laminator cleaning sheets actually effective?
Cleaning sheets are highly effective for preventative maintenance but won't solve severe jams. They work by grabbing fresh, tacky adhesive before it hardens. Think of them as a daily maintenance tool that keeps your rollers in peak condition between deep cleaning sessions. They are an essential part of any professional workflow to maintain a polished final result.
What is the best way to remove a "wrap-around" jam?
The best way to remove a wrap-around is to re-apply low heat to soften the bond and then slowly peel the film back. Use a plastic spatula or wooden stick to lift the edges if necessary. Never use a razor or metal blade, as you'll likely destroy the roller surface. If the jam is too tight to move, it's safer to call a technician than to force the drive motor.
Can I clean the rollers while the machine is turned off?
It's difficult to clean rollers when they're completely cold because the adhesive remains hard and brittle. Most professionals prefer a standby or low heat setting, typically around 150°F. This temperature softens the glue enough to be wiped away without the risk of burns. However, if you're using the soak method with chemicals, the machine must be turned off to prevent dangerous fumes.
Is denatured alcohol safe for all brands of laminators?
Denatured alcohol is considered the industry standard for most professional brands, including Tamerica and GBC. It's effective for learning how to clean roll laminator rollers because it evaporates quickly and leaves no residue. However, you should always perform a spot test on a non-critical area of the roller. If you notice any discoloration or softening of the rubber, switch to a milder, water based solution immediately.
Recent Posts
-
Upgrading Your Office Binding System: The 2026 Professional Guide
Did you know that switching from a manual punch to an electric binding machine can save your team …Jun 27th 2026 -
Professional Wire Binding Supplies in San Diego: Your 2026 Essential Guide
Imagine handing a potential client a thick, high-value report, only for the pages to snag because …Jun 26th 2026 -
Best Binding Method for Professional Reports: A 2026 Executive Guide
The physical feel of your document often speaks louder than the data on the page. In a high-stakes …Jun 25th 2026