What Causes Bubbles in Lamination and How to Fix Them: A Professional Guide
Imagine watching a one-of-a-kind document pass through the rollers, only for a cluster of air pockets to bloom across the surface at the exact moment of no return. It's an expensive mistake that wastes high-quality roll laminating film and puts your most important deadlines at risk. Understanding what causes bubbles in lamination and how to fix them is the difference between a ruined project and a professional-grade finish that commands respect. Most finishing errors aren't the result of a hardware failure; they're usually a simple imbalance in your operating settings.
We believe that the quality of your binding reflects the quality of the work inside. You deserve a seamless, durable result that serves as a tactile marker of your commitment to excellence. This guide provides expert troubleshooting for heat, tension, and material preparation so you can achieve perfect results with every pass. We'll walk through the specific adjustments needed for various film gauges and show you how to maintain the precise control required for a bespoke look. You'll gain the technical confidence to eliminate common finishing errors and learn exactly when it's time to call for a professional repair.
Key Takeaways
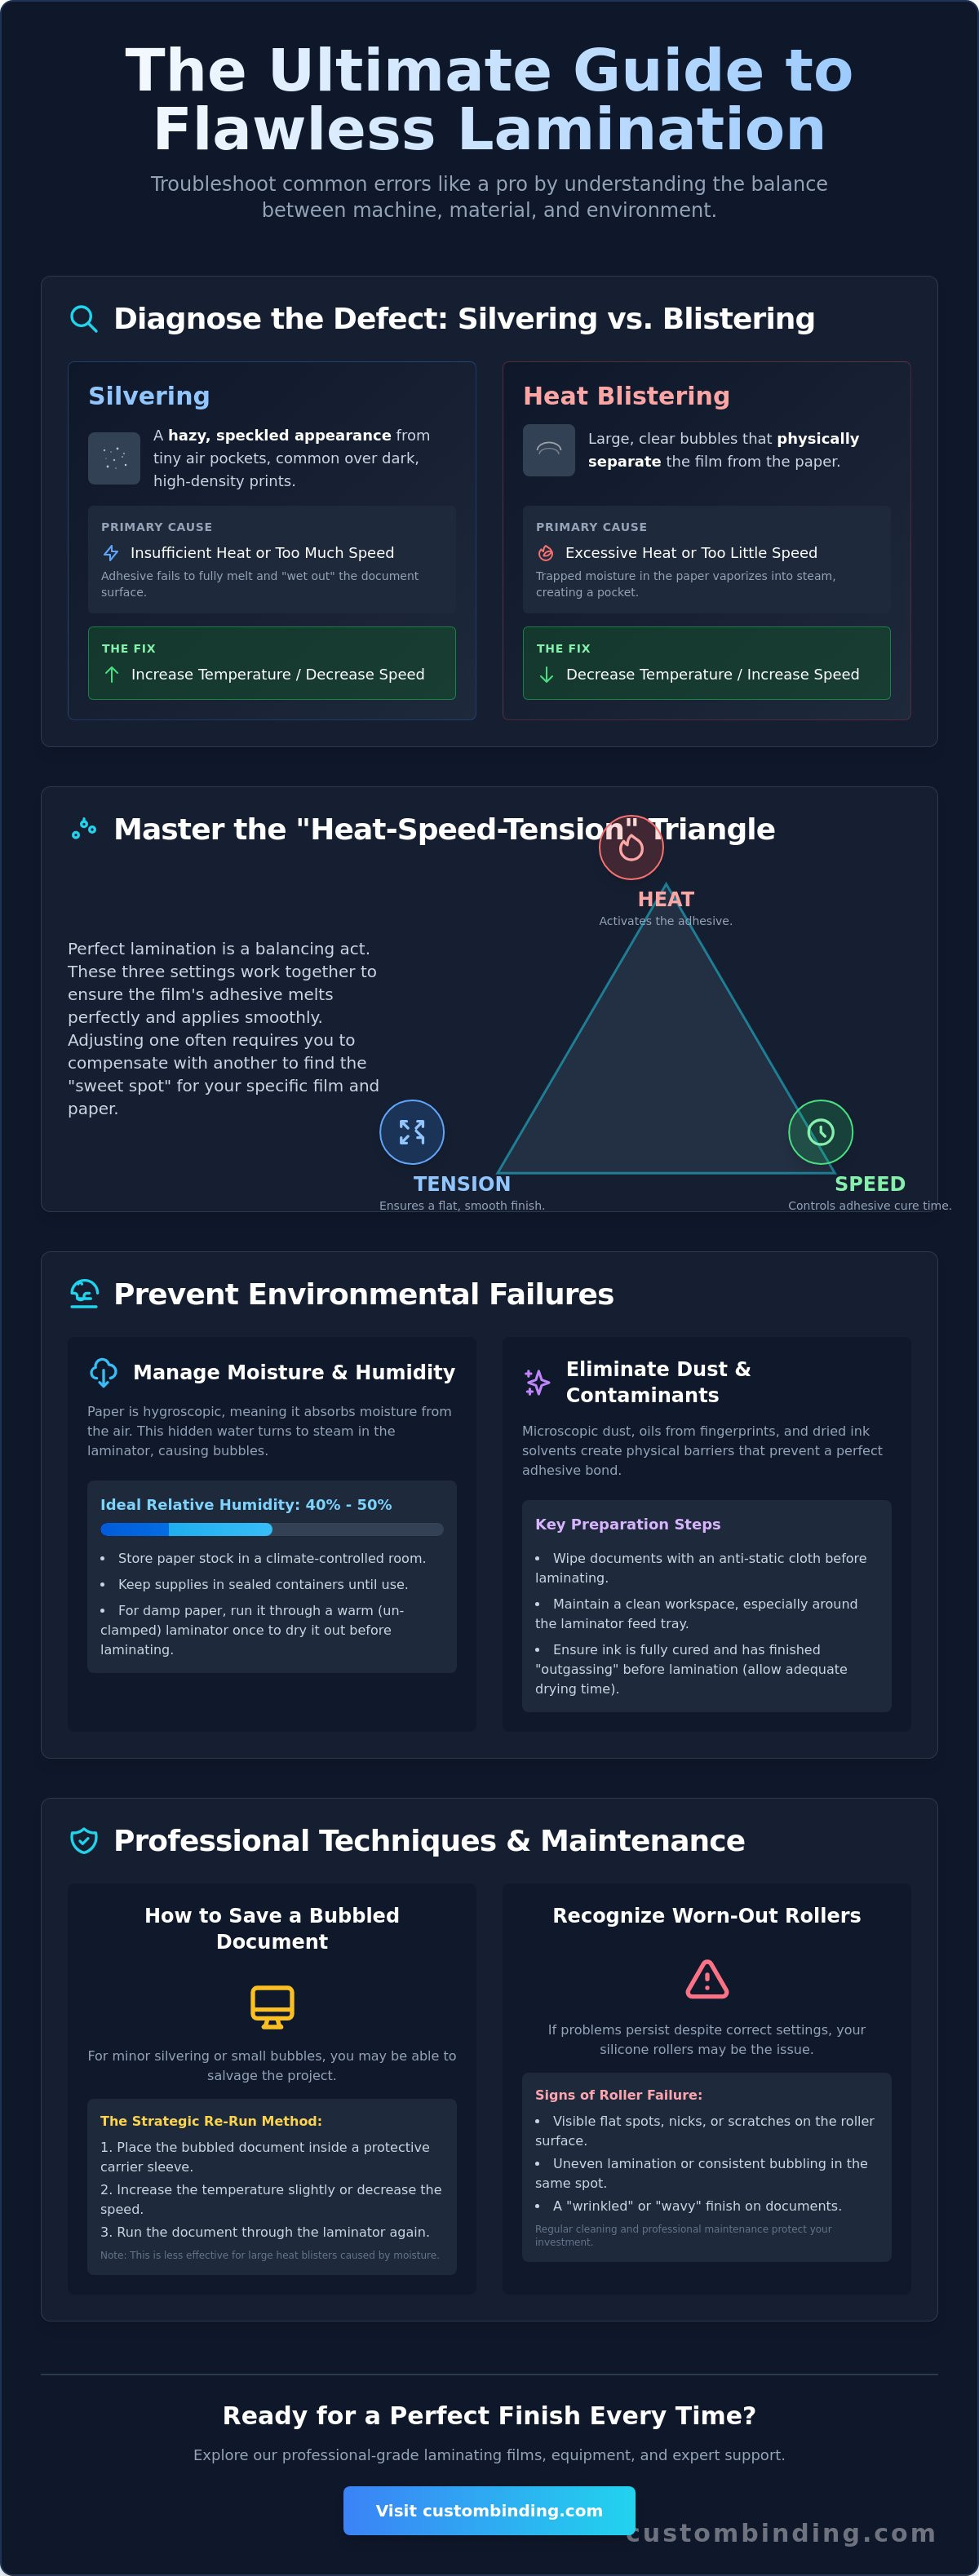
- Identify the visual differences between silvering and blistering to pinpoint whether your equipment is running too cold or too hot for the film gauge.
- Learn how environmental factors like San Diego humidity and microscopic dust particles create air pockets and how to prepare your workspace for a seamless finish.
- Master the "Heat-Speed-Tension" triangle to understand exactly what causes bubbles in lamination and how to fix them by finding the sweet spot for any film thickness.
- Discover professional techniques for saving bubbled documents, including the proper use of carriers and the strategic re-run method to salvage your work.
- Recognize the signs of worn-out silicon rollers and implement a maintenance schedule that protects your investment and ensures a professional-grade result every time.
Silvering vs. Blistering: Diagnosing Your Lamination Bubbles
Achieving a professional-grade finish requires more than just feeding paper into a machine; it demands a specialist's eye for detail. Before you can address what causes bubbles in lamination and how to fix them, you must perform a thorough document inspection. Look for surface contaminants like dust, oils from fingerprints, or high moisture levels in the paper stock. Once the lamination process is complete, the specific appearance of the air pockets will dictate your next mechanical adjustment. Treating all bubbles the same way often leads to more wasted film and further delays.
What is Silvering in Lamination?
Silvering is characterized by a hazy, speckled appearance that looks like tiny silver dots trapped beneath the film. This effect is common when the adhesive doesn't fully bond with the document surface, particularly over dark, high-density digital prints. These prints often undergo "outgassing," where the toner or ink releases residual gases during the heating process. If the machine isn't set to the correct temperature or speed, these micro-bubbles become permanent fixtures. To understand the mechanics, one might ask What is Lamination? in a technical sense. It is the process of creating a composite material through heat and pressure to improve stability and appearance. Silvering is the result of the adhesive failing to fully "wet out" the surface of the document.
The Anatomy of a Heat Blister
Unlike the fine mist of silvering, a heat blister is a large, clear bubble that physically separates the film from the paper. This occurs when the laminator’s temperature settings are too high for the specific paper type or film gauge being used. The excessive heat vaporizes the natural moisture found within the paper fibers, creating a "steam pocket" effect. Since the film creates an airtight seal, the steam cannot escape and pushes the layers apart, resulting in an unsightly bulge. This is why understanding what causes bubbles in lamination and how to fix them is so critical for print professionals.
Your choice of paper stock significantly impacts the likelihood of blistering. Glossy coated papers are especially prone to this issue because their non-porous surface traps moisture more effectively than matte or uncoated stocks. When that trapped moisture hits the high-heat rollers of a machine like the Tamerica Optimus-450, it expands instantly. Recognizing these visual cues allows you to make precise corrections. If you see silvering, you generally need to increase the heat or slow down the throughput. If you see blisters, you must lower the temperature or increase the speed to prevent the paper from overheating.
Environmental Causes: Why Preparation Matters
Environmental factors are often the hidden culprits behind finishing failures. Even with high-end machinery, the ambient atmosphere dictates the success of the bond. In coastal regions like San Diego, humidity levels can fluctuate significantly, directly affecting the moisture content of your paper stock. Microscopic dust particles act as nucleation points; they create a physical barrier that prevents the adhesive from making full contact. These tiny contaminants trap air that expands into visible bubbles once they hit the heat of the rollers. Understanding what causes bubbles in lamination and how to fix them requires a strict focus on your workspace hygiene and climate control.
Managing Moisture and Humidity
Paper is naturally hygroscopic. It absorbs ambient moisture from the air, which can lead to disastrous results during thermal lamination. When moist paper enters the heated rollers, the water content vaporizes into steam. Since the film creates an airtight seal, this steam has nowhere to go, resulting in large, clear bubbles. Store your paper and supplies in a climate-controlled environment with a relative humidity between 40% and 50%. If you suspect your paper is damp, use the "pre-heating" technique. Run the document through the laminator once with the rollers open or at a very low heat setting to drive out residual moisture before the final seal.
- Climate Control: Maintain a consistent temperature and humidity level in your production area.
- Static Management: Use anti-static cloths to remove dust that clings to the document surface.
- Storage: Keep all paper stock in sealed containers until the moment of use.
Ink Solvents and Drying Times
Freshly printed documents are rarely ready for immediate lamination. Inkjet prints and certain digital toners utilize solvents that must evaporate completely before they are sealed. If you laminate too quickly, these solvents continue to release gas, a process known as outgassing. This trapped gas creates a fine mist of micro-bubbles that can ruin the clarity of your work. Follow the 24-hour rule: allow all prints to cure in a well-ventilated area for at least one full day before processing. High-quality roll laminating film is designed to bond with specific ink types, but it cannot overcome the chemical pressure of trapped solvents.
A professional cleaning protocol is your first line of defense against environmental bubbling. Wipe down your machinery daily and inspect the document surface under bright light before feeding it into the rollers. To ensure your projects always meet the highest standards, consider upgrading to professional-grade supplies that offer superior adhesive performance. By controlling these environmental variables, you remove the friction from your document preparation and ensure a durable, impressive result every time.
The Mechanical Fix: Adjusting Heat, Speed, and Tension
Professional finishing isn't a matter of luck; it's a matter of physics. While entry-level guides often suggest simply turning down the heat, a specialist understands that heat, speed, and tension must work in harmony to produce a flawless result. This "Heat-Speed-Tension" triangle is the foundation of high-quality document preparation. If any one of these variables is misaligned, the bond will fail. Mastering these mechanical adjustments is the primary way to address what causes bubbles in lamination and how to fix them before you waste a full roll of expensive film.
Calibrating Temperature for Film Thickness
Dwell time describes the duration the film remains in contact with the heat source. This is the most critical window for adhesive activation. If your speed is too high, the adhesive won't reach the necessary temperature to "wet out" the document, leading to silvering. If the speed is too slow for the heat setting, the paper will overheat and blister. Remember that higher speeds require higher temperatures to maintain consistent adhesive activation across the entire run. Use the following table as a baseline for your initial settings.
| Film Thickness | Recommended Temperature Range |
|---|---|
| 3 Mil Film | 230°F - 250°F |
| 5 Mil Film | 250°F - 270°F |
| 10 Mil Film | 270°F - 290°F |
Mastering Roll Tension and Pressure
Adjusting the supply mandrel tension is a balancing act that requires a steady hand. Too little tension causes the film to sag or flutter, which allows air to become trapped between the film and the document. Conversely, excessive tension leads to "necking," where the film stretches and narrows, creating wrinkles that look like bubbles. If you notice bubbling occurring on only one side of your document, the culprit is likely uneven nip roller pressure. This often happens when the rollers are out of alignment or one side of the pressure adjustment has slipped.
Adjusting your mechanical variables is the most effective method for understanding what causes bubbles in lamination and how to fix them during a high-volume production run. Use the precision controls on machines like the Tamerica Optimus-450 to dial in these settings for every bespoke project. Regularly check the roller alignment on professional-grade roll laminators to ensure that pressure remains consistent across the entire document width. By treating your equipment with the respect a specialist provides, you ensure that every document you produce reflects a standard of excellence and durability.
Immediate Fixes: How to Save a Bubbled Document
Seeing air pockets develop on a critical project is frustrating. It doesn't always signal a total loss, though. While some online forums suggest popping bubbles with a pin, we strongly advise against this. Piercing the film destroys the moisture seal and leaves a visible defect that undermines your professional identity. Instead, a specialist relies on mechanical triage. Understanding what causes bubbles in lamination and how to fix them in the moment allows you to salvage expensive film and meet tight deadlines without compromising the final result.
The Re-Run Technique
The re-run method is your most effective tool for correcting silvering. Since silvering is caused by incomplete adhesive activation, a second pass with modified settings can often force the "wet out" process to complete. Follow these steps to attempt a save:
- Increase pressure: Tighten the nip roller adjustment slightly to ensure maximum contact between the film and document.
- Decrease speed: Slow the motor down to increase the dwell time, allowing the rollers to transfer more heat into the adhesive.
- Use a carrier: Feed the document through again inside a silicon carrier sheet. This evens out heat distribution and prevents the rollers from directly contacting any exposed adhesive.
This works because the additional heat and pressure finish the job the first pass missed. However, if you're dealing with a heat blister, a second pass will likely worsen the damage by expanding the trapped steam. You must distinguish between these two errors before attempting a mechanical fix.
When to Stop: Recognizing Fatal Lamination Errors
You must recognize when a document is beyond repair to protect your equipment. If you see "adhesive squeeze-out", where liquid adhesive leaks from the edges of the film, stop the machine immediately. This residue coats your rollers, leading to permanent scarring or future jams. If the film has permanently bonded to large air pockets or the paper has scorched, the document is a loss. Attempting to force a "wrap-around" jam out of the rollers with sharp tools is a mistake that will ruin the silicon surface. Instead, heat the rollers and gently peel the film back once the adhesive softens. Knowing when to reprint saves your machine from long-term damage and ensures your reputation for quality remains intact.
When trimming a document that had minor bubbling near the edges, always use a professional trimmer. Leave at least a 1/8 inch border of sealed film. Cutting flush against the paper edge on a bubbled document invites immediate delamination. To prevent these issues in future runs, ensure you're using professional-grade roll laminating film designed for consistent adhesive performance. By choosing the right supplies and following a disciplined triage process, you maintain the organized efficiency your business demands.
Professional Maintenance and San Diego Equipment Support
When you've calibrated your settings and controlled the environment but still face persistent finishing errors, the problem likely lies within the machine's internal components. Even the most experienced operator can't compensate for mechanical fatigue. If you're seeing inconsistent bubbling that appears in the same spot on every document, your silicon rollers may have developed flat spots or pitting. These imperfections prevent the uniform pressure required for a flawless bond. Understanding what causes bubbles in lamination and how to fix them eventually requires looking beyond the settings and examining the hardware itself. High-volume production environments in San Diego put significant stress on laminators; regular maintenance is the only way to ensure organized efficiency and professional-grade results.
Cleaning and Conditioning Your Rollers
Maintain a rigorous cleaning schedule to prevent adhesive buildup. As film passes through the rollers, small amounts of adhesive can leak and solidify, creating what industry specialists call adhesive boogers. These hardened lumps create uneven gaps during subsequent runs, trapping air and causing localized bubbling. For high-volume San Diego print shops, we recommend a daily inspection and a weekly deep clean using specialized rubber roller cleaners.
- Step 1: Heat the rollers to a low setting to soften any residual adhesive.
- Step 2: Use a soft cloth and an approved rubber cleaner to gently wipe the surface.
- Step 3: Rotate the rollers slowly to ensure you've cleaned the entire circumference.
Never use sharp metal objects or razor blades to scrape the rollers. A single nick in the silicon can ruin the roller entirely, leading to permanent finishing defects that no amount of heat adjustment can solve. By keeping the rollers pristine, you ensure the finishing touch remains a hallmark of your professional identity.
Expert Repair Services in San Diego
Sometimes, the root cause of your frustration is electrical. If your machine's heating element or thermostat begins to fail, the temperature will fluctuate during a run, causing intermittent silvering and blistering. This is when you need a Reliable Specialist to step in. Custom Binding Products provides on-site equipment repair services for San Diego businesses, ensuring your GBC or Rhin-O-Tuff machines operate with the precision they had on day one. A professional tune-up includes roller alignment, thermostat calibration, and deep cleaning, which can extend the life of your hardware by years.
The quality of your supplies also plays a critical role in machine longevity. Inferior films often have inconsistent adhesive layers that ooze more easily, leading to faster roller contamination. Switching to high-quality wholesale laminating film reduces the frequency of maintenance and provides a more predictable, bespoke finish. By pairing superior supplies with expert mechanical support from Custom Binding Products, you remove the friction from your production process and ensure that every document reflects the high standards of your brand. Understanding what causes bubbles in lamination and how to fix them is a technical skill, but maintaining the equipment is a professional investment.
Elevate Your Document Presentation with Precision Finishing
Mastering the balance of heat, speed, and tension is the key to professional results. By distinguishing between silvering and blistering, you can make the precise mechanical adjustments needed to save your projects. Controlling environmental factors like humidity and allowing for proper ink curing time removes the friction from your preparation. Understanding what causes bubbles in lamination and how to fix them transforms a frustrating equipment failure into a manageable part of your production workflow.
Consistency in your output depends on both technical skill and the quality of your hardware. Serving San Diego since 1988, we're proud to be an authorized dealer for industry leaders like Akiles, Rhin-O-Tuff, and GBC. Whether you need a steady supply of high-performance film or expert on-site maintenance, we're here to support your professional success. Solve your lamination issues with professional-grade supplies and expert San Diego repair from Custom Binding Products.
Take pride in the craftsmanship of your documents. With the right tools and a specialist's approach, every piece you produce will leave a lasting, sophisticated impression.
Frequently Asked Questions
Can I fix bubbles in lamination after the document has cooled?
You can often fix silvering bubbles by re-running the cooled document through a heated laminator at a slower speed or slightly higher temperature. This process reactivates the adhesive and forces out trapped air. However, heat blisters caused by vaporized moisture are permanent. Once the paper fibers are damaged and the film has stretched, the document cannot be salvaged without a complete reprint.
Why does my laminator only bubble on one side of the page?
Bubbling on a single side typically indicates that your nip rollers aren't applying consistent pressure across the width of the document. This mechanical misalignment allows air to enter the side with less tension. Check your machine's pressure adjustment knobs or inspect the rollers for uneven wear. In roll laminators, an unlevel supply mandrel can also cause the film to track poorly on one side.
Is it safe to pop lamination bubbles with a needle?
No, popping bubbles with a needle is not recommended for professional-grade results. Piercing the film creates an entry point for moisture and oils, which will eventually lead to delamination and yellowing. Instead of using a needle, focus on understanding what causes bubbles in lamination and how to fix them through proper temperature and tension calibration. This ensures a seamless, durable finish that protects your professional reputation.
How long should I wait for ink to dry before laminating?
Waiting 24 hours is the industry standard for preventing outgassing. This occurs when residual solvents in the ink evaporate after the document is sealed. If you laminate too soon, these gases create a "silvering" effect or tiny micro-bubbles beneath the film. For high-density graphics or heavy ink coverage, extending the drying time to 48 hours ensures the adhesive bonds perfectly with the media surface.
What is the best temperature for laminating 5 mil film?
Most 5 mil films require a temperature setting of 250°F to 270°F to achieve full adhesive activation. Your specific machine's speed and the paper's thickness will dictate where you fall within this range. Thicker cardstock absorbs more heat; you may need to increase the temperature or slow the throughput speed to maintain the "sweet spot" for a professional-grade, bubble-free result.
Can a cheap laminator cause more bubbles than a professional one?
Yes, entry-level machines often lack the precision controls and consistent heat distribution of professional models. Low-cost laminators often suffer from inconsistent heating elements and fixed pressure settings, making it difficult to address what causes bubbles in lamination and how to fix them during a run. Professional machines offer variable speed and temperature controls, allowing you to fine-tune the process for a bespoke, high-quality finish every time.
Do I need a carrier sheet to prevent bubbles in my pouch laminator?
You should use a carrier sheet if your laminator's instructions require one or if you're working with fragile documents. Carrier sheets help distribute heat evenly and prevent adhesive from leaking onto the rollers, which is a common cause of localized bubbling. While many modern pouch laminators are designed for carrier-less operation, using one provides an extra layer of protection for heat-sensitive items and ensures a smoother bond.
How do I know if my laminator rollers need to be replaced?
Inspect your rollers for visible pitting, flat spots, or persistent adhesive buildup that cannot be cleaned. Rollers require replacement when they no longer apply uniform pressure or heat. Signs of failure include consistent bubbling in the same location or visible valleys in the silicon surface. If regular cleaning with specialized rubber cleaners doesn't restore a smooth finish, it's time to seek professional repair to maintain your equipment's reliability.
Recent Posts
-
Upgrading Your Office Binding System: The 2026 Professional Guide
Did you know that switching from a manual punch to an electric binding machine can save your team …Jun 27th 2026 -
Professional Wire Binding Supplies in San Diego: Your 2026 Essential Guide
Imagine handing a potential client a thick, high-value report, only for the pages to snag because …Jun 26th 2026 -
Best Binding Method for Professional Reports: A 2026 Executive Guide
The physical feel of your document often speaks louder than the data on the page. In a high-stakes …Jun 25th 2026